Documentation
Everything you need to know about using Navu
Looking for something specific?
Reading Your Website Performance Report
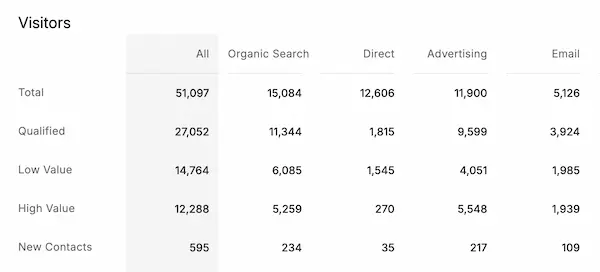
Overview Depending on settings, Navu will send a weekly report detailing how your website is performing. This report lists visitors, conversion rates and leads from several points of view. Sitewide: How your site as a whole is performing in terms of attracting visitors and converting them into leads. By Channel: How the channels that drive visitors to your site are performing in terms of acquiring visitors and how those visitors convert into leads. By Named Campaigns: How the major campaigns (typically advertising and email outreach) that drive visitors to your site are performing in terms of acquiring visitors and how … Read more
Navu Integration for Slack
Overview Navu’s integration with Slack enables Navu to post detailed alerts into any Slack channel. These alerts are triggered by specific visitor activity on your website. Below is an example. Setup Before enabling this integration ensure there is a Slack channel in your Slack organization into which you would like Navu to post alerts. This can be an existing channel, or one you create specifically for Navu alerts. Choosing the latter has the benefit of allowing you to invite others to that channel once you are familiar with Navu alerts. In the Navu portal, select Integrations from the hamburger menu … Read more
Navu Integration for HubSpot
Overview Navu’s integration with HubSpot enables the exchange of information between the two platforms enhancing the contact/visitor information in both systems. Navu Benefits The integration allows Navu to augment visitor information based on HubSpot data by highlighting the HubSpot contact information in the Navu visitor details. In addition, if the HubSpot embed code is installed on your website, then Navu will leverage HubSpot first and third party cookies to determine the identity of the visitor. In other words, if HubSpot knows the identity of the visitor, then Navu will also be aware of their identity. This is beneficial when viewing … Read more
Navu Integration for Salesforce
Overview Navu’s integration with Salesforce enables the exchange of information between the two platforms enhancing the contact/visitor information in both systems. Salesforce Benefits Once enabled, this integration will make three fields available to the Contact record in Salesforce. To see these, the Salesforce administrator will need to update the Page Layouts for the Salesforce Contact object to include these fields. These will then appear in the contact record as follows. Note, that a WebLink is also created that can be used in place of the Navu Web Journey URL field to make the presentation of this link prettier. The first … Read more
Installing Navu on a TYPO3 website
This article from TYPO3 explains how to add script to the <head> of your TYPO3 website. The snippet of code to add is shown below. Replace the __SiteCode__ with the 7 digit alphanumeric code for your site. If you already have access to your Navu portal you can find your embed code here. If you have not signed up yet, then contact [email protected] to get a SiteCode. Alternatively, once you have signed in to the Navu application, navigate to the Domains tab. Find your site, and click on the INSTALL link. Copy the Navu embed code from there, and add it to the <head> of all pages … Read more
Configuring Your Consent Management Platform For Navu
It is your responsibility to fulfill your privacy obligations to your website visitors. Navu is a first party cookie and does not track visitors between sites and never shares visitor information with anyone but the website owner. The steps below explain how to extend consent management from your existing Consent Management Platform (CMP) to include Navu. Functionally, the Navu embed code enables visitor tracking in a very similar way to Google Analytics. Typically, the Navu cookie can be added to your CMP in the same way the Google Analytics cookie is added. Supported CMPs If you use one of … Read more
The Navu Panel
Adding the Navu panel to your website allows you to easily see in real-time what every visitor to your site is doing and to focus on visitors of particular interest to you. This is where you can learn more about how the Navu Panel works and how best to use it. Table of Contents At a Glance Getting Started Recent Visitors Journeys Visitor Selections Filtering Search Minimizing Navu Members and Invitations Troubleshooting Uninstalling Navu At a Glance After Navu has been added to your website, anyone with permission can access the Navu Panel right on the website itself. To see the … Read more
Installing Navu on a Wix website
Wix supports a simple way to add code snippets, such as the Navu embed code, to your site. This article from Wix explains how to accomplish this. The snippet of code to add is shown below. Replace the __SiteCode__ with the 7 digit alphanumeric code for your site. If you already have access to your Navu portal you can find your embed code here. If you have not signed up yet, then contact [email protected] to get a SiteCode. Alternatively, once you have signed in to the Navu application, navigate to the Domains tab. Find your site, and click on the INSTALL link. Copy the Navu embed code … Read more
Ensuring Navu Has Access To Your Site
To facilitate creating guides, Navu indexes your site to build a library of resources including images, webpages, videos, PDFs and forms. This indexing is very similar to the way Google and other search engines build their indexes. As such, Navu’s servers need access to your site. If you are running security software (such as Sucuri or StackProtect) or a CDN (such as Cloudflare or Akamai) they may block access by Navu’s servers. To ensure Navu can reach your site in these cases, it may be necessary to whitelist the IP addresses of Navu’s servers. For details on how to … Read more
Installing Navu on a Webflow website
Webflow supports a simple way to add code snippets, such as the Navu embed code, to your site. This article from Webflow explains how to accomplish this. The snippet of code to add is shown below. Replace the __SiteCode__ with the 7 digit alphanumeric code for your site. If you already have access to your Navu portal you can find your embed code here. If you have not signed up yet, then contact [email protected] to get a SiteCode. Alternatively, once you have signed in to the Navu application, navigate to the Domains tab. Find your site, and click on the INSTALL link. Copy the Navu embed code … Read more
Installing Navu on an Unbounce landing page
Unbounce supports a simple way to add code snippets, such as the Navu embed code, to their landing pages. This article from Unbounce explains how to accomplish this. The Navu embed code should be added to the head of the page. The snippet of code to add is shown below. Replace the __SiteCode__ with the 7 digit alphanumeric code for your site. If you already have access to your Navu portal you can find your embed code here. If you have not signed up yet, then contact [email protected] to get a SiteCode. Alternatively, once you have signed in to the Navu application, navigate to the Domains tab. … Read more
Where to find my site code
Here is where to find the 6 digit alphanumeric site code and the Navu embed code specific to your site. Site Code To find the site code, sign in to the Navu application and navigate to the Site tab. The site code can be found in the top section under CODE. Embed Code To find the embed code, sign in to the Navu application, navigate to the Domains tab. Find your site, and click on the INSTALL link. Copy the Navu embed code. Use this Navu embed code snippet when installing Navu.
Installing Navu on a WordPress Website
The Navu WordPress plugin is the simplest way to add Navu to your WordPress website. Here are the instructions to install the plugin: 1. Log in to your WordPress account. 2. In the left hand panel, hover over Plugins, then click Add New. 3. Enter navu in the Keyword field. 4. The Navu plugin will appear. Click Install Now. 5. Click Activate. 6. Scroll down the list of plugins to Navu Conversions, and click Settings. 7. Enter your site code, and click Save Changes. Where to find my site code? Once the Navu embed code has been installed, Navu will … Read more
Installing Navu on a Squarespace website
Squarespace supports a simple way to add code snippets, such as the Navu embed code, to your site. This article from Squarespace explains how to accomplish this. The snippet of code to add is shown below. Replace the __SiteCode__ with the 7 digit alphanumeric code for your site. If you already have access to your Navu portal you can find your embed code here. If you have not signed up yet, then contact [email protected] to get a SiteCode. Alternatively, once you have signed in to the Navu application, navigate to the Domains tab. Find your site, and click on the INSTALL link. Copy the Navu embed code … Read more
Installing Navu on a Ghost website
Ghost supports a simple way to add code snippets, such as the Navu embed code, to your theme files without editing them. This article from Ghost explains how to accomplish this. The snippet of code to add is shown below. Replace the __SiteCode__ with the 7 digit alphanumeric code for your site. If you already have access to your Navu portal you can find your embed code here. If you have not signed up yet, then contact [email protected] to get a SiteCode. Alternatively, once you have signed in to the Navu application, navigate to the Domains tab. Find your site, and click on the INSTALL link. Copy … Read more
Installing Navu on a HubSpot website
HubSpot supports a simple way to add code snippets, such as the Navu embed code, to your site. This article from HubSpot explains how to accomplish this. Follow the link and scroll down to the “Add code snippets to all content hosted on a specific domain” section. The snippet of code to add is shown below. Replace the __SiteCode__ with the 7 digit alphanumeric code for your site. If you already have access to your Navu portal you can find your embed code here. If you have not signed up yet, then contact [email protected] to get a SiteCode. Alternatively, once you have signed in to the Navu … Read more
Installing Navu
Navu can be added to any website. The installation instructions depend on the underlying Content Management System (CMS) for your site. Click the relevant CMS from the list below for specific instructions. Installing Navu on a WordPress website Installing Navu on a Squarespace website Installing Navu on a Ghost website Installing Navu on a HubSpot website Installing Navu on a TYPO3 website Installing Navu on a Webflow website Installing Navu on a Wix website Installing Navu using Google Tag Manager If your CMS is not listed above, the snippet of code below should be added to the <head> of all … Read more
Why the Guide or Preview may not be visible when getting started
There are two core steps to the Navu Guide creation and preview process. Guide Creation Once you have entered a target landing page for the Guide you wish to create, Navu will attempt to index that landing page along with other pages on the same domain as the landing page. Indexing in this case means scanning pages for content and images that will be appropriate to use when building the individual cards that appear in the Guide. To accomplish this indexing, Navu uses a headless browser to load the landing and related pages. Some websites may detect the Navu headless … Read more
How to Use the Navu WordPress Plugin
The Navu WordPress plugin is a simple way to incorporate Navu onto your website. If you are new to Navu and looking for a site code, please either contact us at [email protected] or fill out the form here. Here are the instructions to install the plugin: If you run into any problems with these instructions, don’t hesitate to contact us at [email protected]. This post has been deprecated. Please see the latest version here.
Installing Navu with Google Tag Manager
3. Give the new tag a name, and click on Tag Configuration. 4. In the side panel that opens, select Custom HTML. 5. Enter the HTML below into the HTML text box replacing SiteId with the Navu site code for your site. 6. Click on Triggering. 7. Click on All Pages. 8. Then click Save. 9. Click Submit in the top right corner to submit the updated version of your workspace with the new Navu tag. 10. Add an optional appropriate version name and description, and click Publish to publish the workspace.